Update 04/04/2023
I realized I had a mistake in Outbound rules, so I updated the picture. Interface for source 10.0.20.0/24 should be CORPORATE_LAN_VLAN20 instead CORPORATE_WAN_VLAN10.
Update 29/07/2022
As I used DHCP service only for testing purposes, I disabled it now as we have a domain controller in our corporate network that will serve also as a DHCP server.
Update 05/05/2022
Edited the network topology by adding a new VLAN 99 as isolation network for malware analysis.
In the previous post, we created a network topology where we visualized how our network should look after VLAN segmentation and subnet separation. We’ve decided that we need 4 VLANs with specific traffic restrictions that we will set up today, therefore we’ve created in our virtualization tool 4 additional network interfaces. Now comes the good part of this guide, deployment of the virtual machine, and we will start with the firewall of course.
pfSense
For our firewall, we will use a pfSense, an open source firewall that is a great tool not just for your labs, but also can be quite good for production/company environments. Below is a VM specification that we will use for our firewall:
- CPU: 1
- RAM: 512MB
- HDD: 30GB
- NICs: 6x
- Bridged
- vmnet1
- vmnet10
- vmnet20
- vmnet50
- vmnet99
Before we start with the installation, let me explain shortly why we need this many NICs. As you know, we have 5 networks that we’ve created for our lab environment: management, corporate LAN, corporate WAN, security, and isolation LAN. For each network, we’ve assigned a specific network interface to the firewall. The sixth one (or the first one on the list) is a bridged interface, an interface that sits in the LAN network of our physical laptop. This interface will be used to provide outbound traffic toward real internet, for devices in the security network.
Installation
Installation is pretty straightforward. Just go will all default options and continue until the end of the installation wizard. Once installed, you will need to reboot it. Once rebooted you will see it booted with two configured interfaces, WAN and LAN.
Using the pfSense CLI we will first configure WAN and LAN (management) interfaces with the correct IP addresses and gateways, so we could access it properly and allow it to go to the internet. We will use the table below for further IP addresses that we will assign to the firewall interfaces.
Note: For the WAN interface (bridged network) you need to check in what network your laptop sits on, or better say, what is the network subnet that your ISP modem provides IPs from. The example from the table below is for my own network, which doesn’t mean it is the same for you. Also, during a CLI setup of WAN and LAN, you will only need to configure a default gateway for the WAN interface, which will be your ISP modem (usually 192.168.1.1 or 192.168.0.1).
| Interface | IP address |
|---|---|
| WAN | 192.168.1.50/24 |
| Management | 10.0.1.50/24 |
| Corporate WAN | 10.0.10.254/254 |
| Corporate LAN | 10.0.20.254/24 |
| Security | 10.0.50.254/24 |
| Isolation LAN | 10.0.99.254/24 |
Once you configure WAN and LAN interfaces, you should be able with the pfSense default credentials (username: admin, password: pfsense).
Configuration
Interfaces
First, you will need to assign all interfaces to the pfSense. This can be done by going to Interfaces > Interface Assignments and then clicking the Add button for each interface in the list and then clicking the Save button. This will add all our interfaces and add generic names to each of them (OPT1, OPT2…).
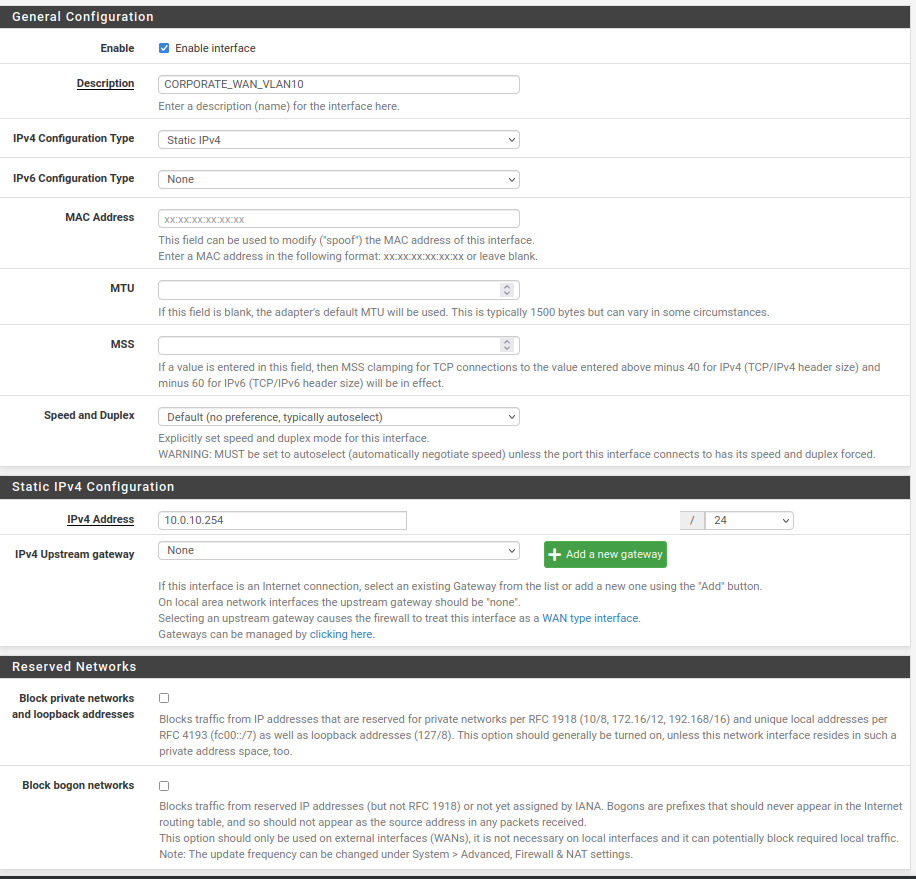
The next step is to enable and configure each interface with the correct description and IP address. Open each interface according to the instructions below:
- Enable: Checked
- Description: $NETWORK_NAME_VLAN<VLAN_NUMBER>
- IPv4 Configuration Type: Static IPv4
- IPv6 Configuration Type: None
- MAC Address: leave empty
- MTU: leave empty
- MSS: leave empty
- Speed and Duplex: Default
- IPv4 Address: The IP address of the interface from the previous table. Mask set to /24
- IPv4 Upstream gateway: None (only WAN interface should have configured this field)
- Block private networks: unchecked (this field should be checked for WAN interface only)
- Block bogon networks: unchecked (this field should be checked for WAN interface only)
Your configuration should look something like the picture below:
And after configuring all interfaces you should see something like:
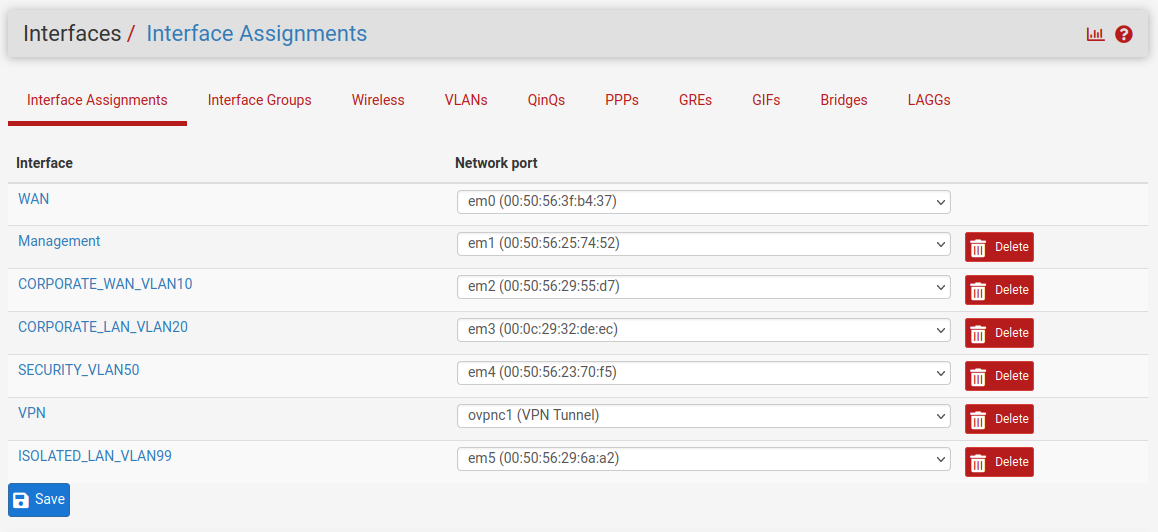
Note: Ignore the VPN interface on the picture for now. That will be part of an extra task. ;)
Basic configuration
Let’s configure some basic configurations like DNS servers, domain name, timezone, etc.
Go to System > General Setup and configure the following fields:
- Hostname: Set whatever you would like to call your firewall. In my case, it is **firewall”
- Domain: racoon.bandito (again, this is my lab, you can choose whatever domain name you want)
- DNS Servers: 9.9.9.9 and 1.1.1.1 (or you can use Google 8.8.8.8 and 8.8.4.4)
- Timezone: Etc/UTC
- Theme: I prefer a dark theme, but for the sake of this guide, I will use the light one
Click on the Save button at the bottom of the screen.
Then go to System > Advanced > Admin Access:
- Protocol: HTTPS (SSL/TLS)
- Secure Shell Server: Enable
You can check other settings in this window, but I find this configuration enough for the lab.
Firewall Rules
We will now configure firewall rules to allow/restrict specific traffics between the networks. For the beginning, we will allow all traffic, but at some point, we might restrict the access and allow only specific traffic/ports/services to pass.
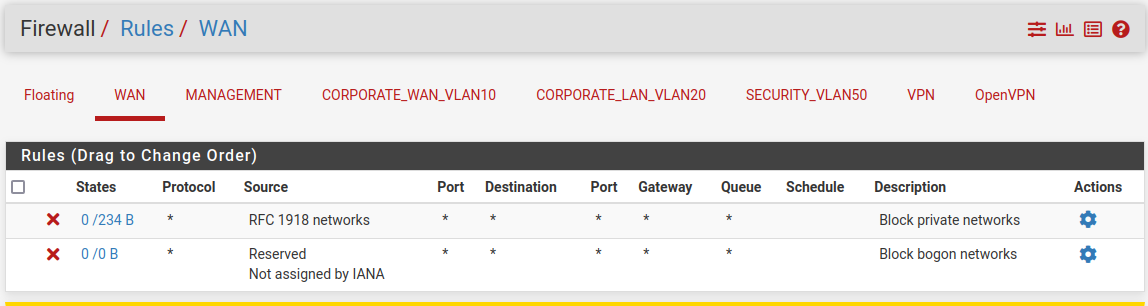
WAN
This interface should have default rules that come with enabling fields Block private networks and Block bogon networks during initial configuration.
MANAGEMENT
As this is our management interface, by default it has some rules configured, for passing traffic and an anti-lockout rule. We will disable the IPv6 rule and the rest should be like in the picture below.

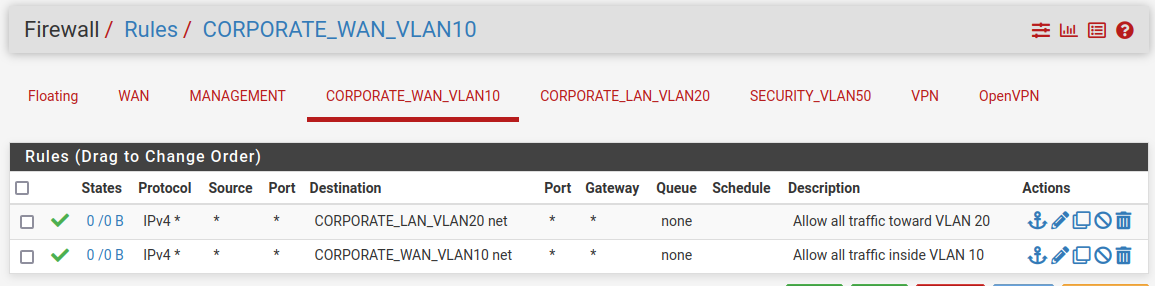
CORPORATE WAN
Here we will allow all traffic toward the Corporate LAN network and Corporate WAN network. Everything else will be blocked by default as there is a default rule “deny all” that denies all traffic. That invisible rule is placed at the end of each interface’s firewall rules.
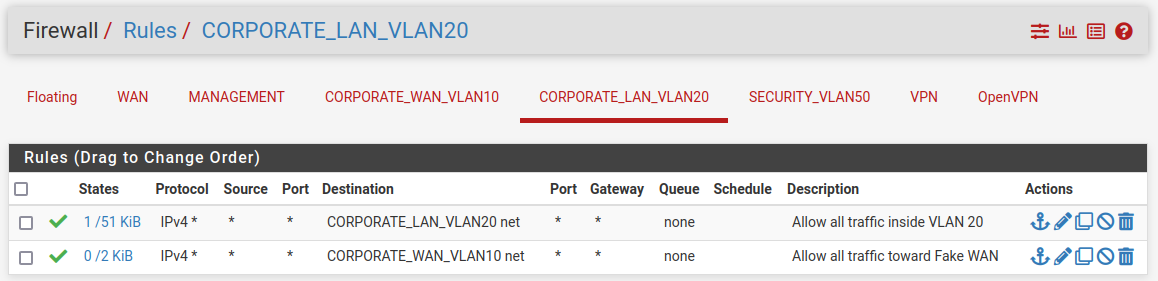
CORPORATE LAN
This interface should have the same rules as the CORPORATE_WAN interface. This is because we want to simulate its access to the “internet”. In a real scenario, rules would be different of course.
SECURITY
The security network should not have access to WAN, Management, and Corporate WAN networks, but should have access to everything else.

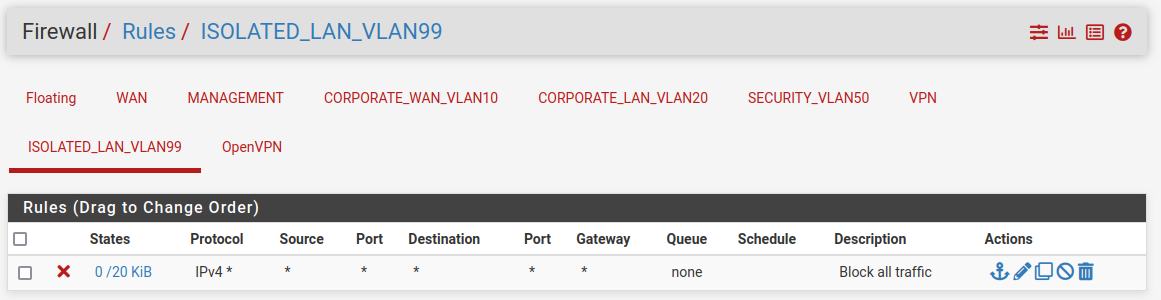
ISOLATION LAN
At last, the isolation network should not have access to anything except to the local network. By default, there is a rule deny all that denies all traffic that comes to the interface, but just to be sure we will create a rule for that.
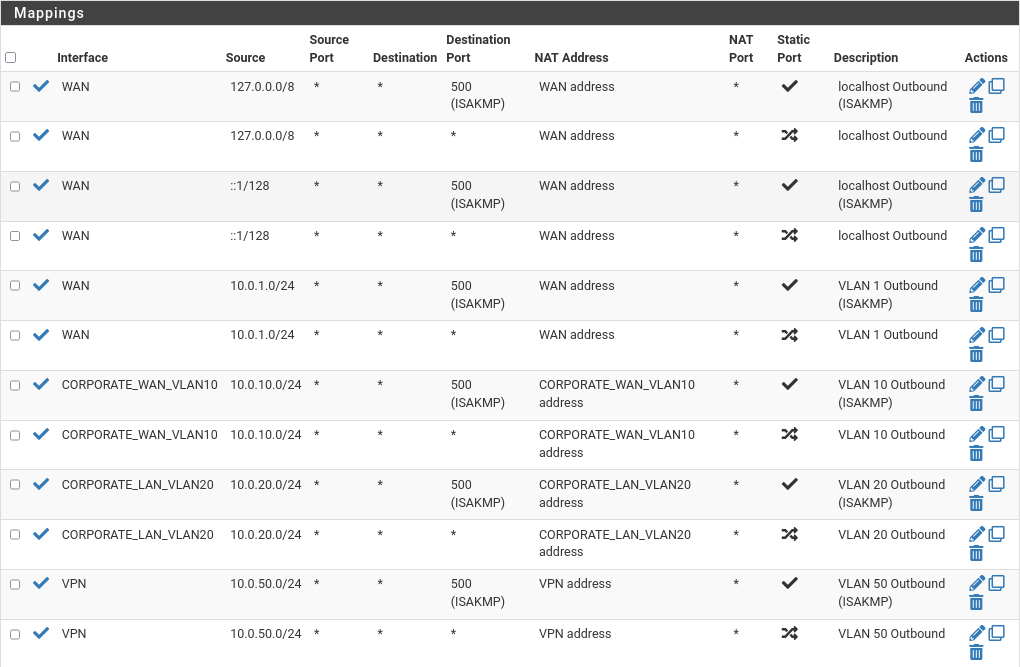
Outbound
In order to allow security network access to the internet and simulate other networks’ access to the internet through the fake WAN, we need to set up the rules as on the picture below, in Firewall > NAT > Outbound:
Extra content and bonus task
While we configured only a small part of what pfSense is capable of, I encourage you to go and explore it further. There are quite a lot of good and interesting features, like setting up a VPN server, IPSec tunnel, installing IDS and IPS tools, and more. Here are a few interesting contents to get deeper knowledge about it:
- Getting started with pfSense by Lawrence Systems (this guy has a lot of good videos about pfSense)
- Visualize pfSense logs in Grafana by I.T Security Labs
- pfSense official documentation
Bonus task: If you are using some VPN service (like ProtonVPN, NordVPN, or some else), configure pfSense to send all traffic from a security network through the VPN if it goes outside, to the internet.
Summary
We came to the end finally. My intentions were not to make this long article, but as mentioned previously, I will try to cover as many details as I can, so everybody who follows these guides, won’t have any issues. In the next article, we will start building our security team environment (except SIEM, which will be covered in some of the later phases). Hope you enjoyed it!