Update 05/05/2022
Edited the network topology by adding a new VLAN 99 as isolation network for malware analysis.
In the previous post, we covered the hardware requirement that I have (and that I recommend) for building this lab. Depending on your desires, you do not need to set up every single VM or service that I install. Setup only those that you are interested in because mostly they do not depend on one another. There are a few of those that are common and must have (IMO) for the lab, and I will mention which one, but that’s it. Just install and use what you like. :)
Hosts and services
As I am coming from a networking world, of course first thing I will do is to create a network diagram of my lab. This diagram contains all the VMs I am planning to include, along with detailed information like IP addresses, VLANs, subnets, etc.
Now you need to make a list of things you would like to use your lab for, so you could then make a list of the type of devices/VMs you need. For example, I wanted to do almost all of it, SIEM, malware analysis, DFIR, OSINT, Vulnerability Scanning, Email Forensic, and so on. So I started with a “small” list of what I needed:
- Firewall
- Malware Analysis (MA) VMs (one for Linux and one for Windows)
- Windows 7 host
- Windows 10 host
- Windows Server AD
- Linux Server(s)
- Kali Linux
- DFIR
- SIEM
- Vulnerability Scanner
Some of the services I would like to have in my lab are:
- Antivirus
- EDR/XDR
- Proxy
- Mail Server
- AD Services
- IDS/IPS
- Monitoring
- Docker
- Database (not sure yet what kind of, but will think about it)
While this may look overwhelming and an extensive list, some of these services can be served on the same server, or we can simply duplicate servers with different services.
Network
OK so we have now types of hosts and services that we want to deploy, let’s get into the networking. As this lab will include various VMs, from DFIR, servers, and also Kali Linux for simulating outside attacks, after some planning, I decided that for a start I will need 5 VLANs:
- VLAN 1: This will be our management VLAN to access a firewall web GUI (more on this later).
- VLAN 10: This will be our corporate WAN VLAN (or Fake WAN). This VLAN will include Kali Linux which will simulate a malicious device coming from outside. Plus it will have access only to corporate VLAN 20. I don’t want to be able to reach the real Internet or my personal machine, as I don’t want to push some malicious script/software by accident to others.
- VLAN 20: Corporate LAN network. This is where we will put our servers and end devices (Windows 7 and Windows 10 for example). This VLAN should have access only to the fake internet network.
- VLAN 50: This will be my security VLAN that will contain VMs for DFIR, OSINT, and others. This will simulate a security team network that will have network permission to reach the corporate network (but not the other way around) in order to retrieve logs, files, emails, etc. Also, this network will have access to the real internet, so we can use public tools for analysis (VirusTotal, Talos, MXToolbox…) and perform tools installation and upgrade.
- VLAN 99: This will be my isolated LAN network which will contain VMs for malware analysis. This is needed so we can performa both static and dynamic malware analaysis without a risk of getting infected any other machine (like our physical device for example).
Another thing that we are going to need for our corporate environment is a domain. For this lab purpose, I choose it to be racoon.bandito. :)
For each of these VLANs we are going to add a dedicated network subnet so we are ending with the network information in the table below:
| Name | Domain | VLAN | Subnet | Gateway |
|---|---|---|---|---|
| Management | N/A | 1 | 10.0.1.0/24 | 10.0.1.1 |
| Corporate WAN | N/A | 10 | 10.0.10.0/24 | 10.0.10.254 |
| Corporate LAN | racoon.bandito | 20 | 10.0.20.0/24 | 10.0.20.254 |
| Security | racoon.bandito | 50 | 10.0.50.0/24 | 10.0.50.254 |
| ISOLATED LAN | N/A | 99 | 10.0.99.0/24 | 10.0.99.254 |
Note: Now is a good time to make all these notes in your note-taking app. We will also configure static IPs for almost all hosts in our network.
VLAN creation
The final step is to create those networks in our VMware (or whatever virtualization tool you use), so we could prepare everything for the next steps.
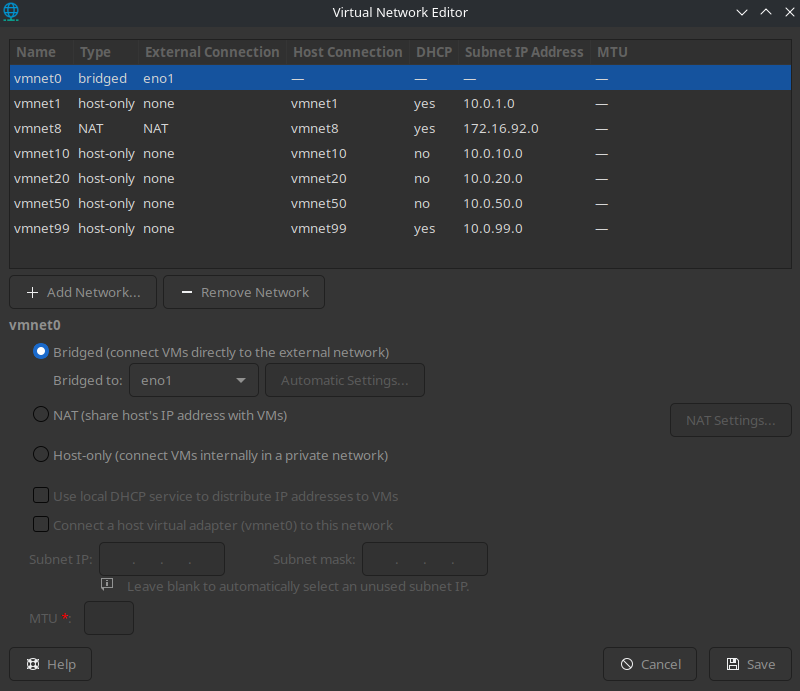
In VMware go to Edit > Virtual Network Editor (you will need to provide admin credentials most likely). Then add 4 networks by clicking the Add Network… button and name them vmnet10, vmnet20, vmnet50, and vmnet99. All three network types should be host-only.
Next for each network uncheck the field Use local DHCP service to distribute IP addresses to VMs as we will use our firewall as DHCP server, and set up the subnet IPs that we assigned them in the previous table (or if you prefer, assign other subnets that you wish).
Finally, our configuration should look like the picture below.
Topology
This is how our topology should look now, after VLAN segmentation and device separation by VLANs/subnets.
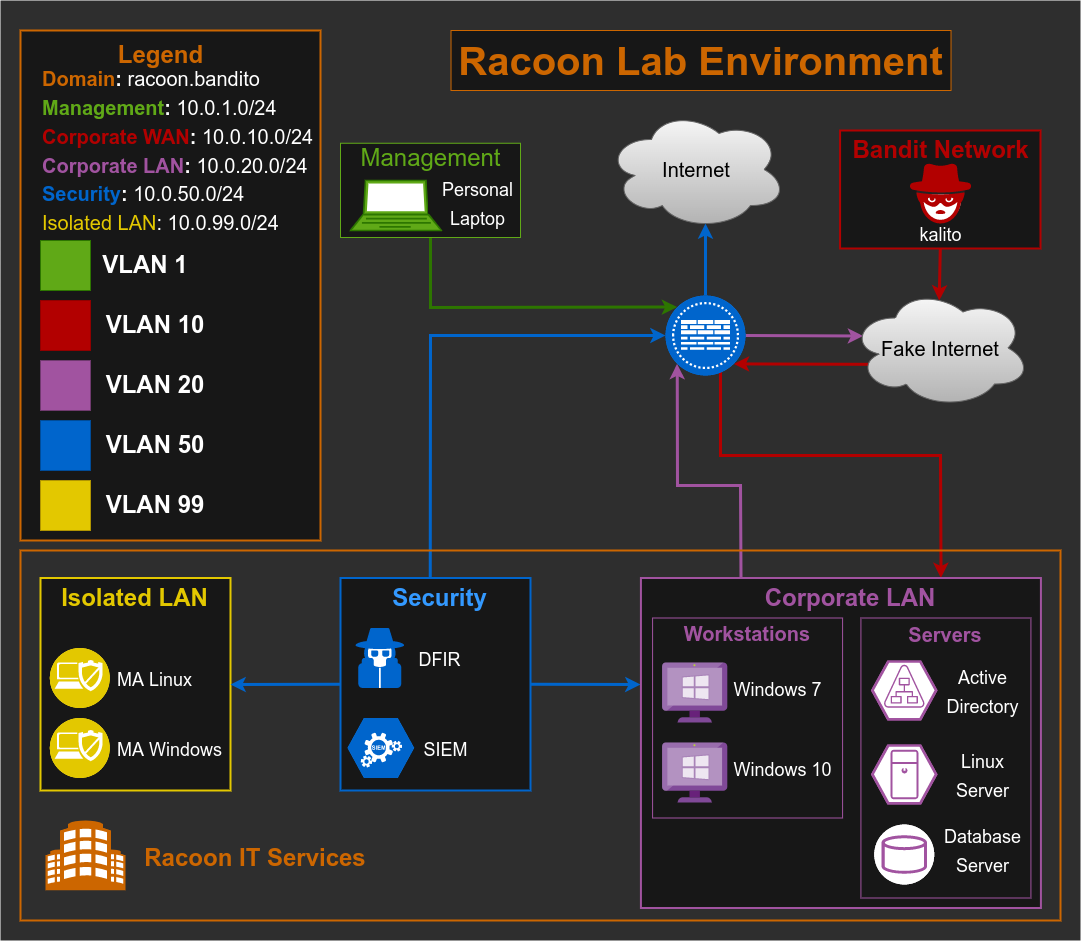
Cool right? :)
I don’t know any draw.io specific tutorial that is good, as I never watched one. I only started using it and things came along, so I am pretty sure you will too, and that there are plenty of good tutorials on Youtube. Is this a bit complex topology and maybe a bit uneccecarry? Maybe, but hey, I wanted to make it complex, similar to real environment, don’t blame me. :)
Summary
So far, we’ve created VLANs for our network, assigned subnets, and created a network topology of our home lab, and this is just the beginning. This topology will most likely change (or better say evolve) over time, as you add new devices and services, it is up to you, what you want and what you need. In the next article, we will finally start actually building our lab. Stay tuned! :)