In the previous post, we deployed our first VM, the starting point, the firewall itself. We configured many firewall interfaces, segment them by VLANs, configured DNS and DHCP services, and we’ve set up the basic firewall rules. Those rules will most likely be changed at some point, but for now, we will leave them as they are.
Now it is time to set up a security team, which will consist of a few machines: DFIR, MA Windows, MA Linux, and possibly a SIEM. In this article, we will install a Tsurugi Linux which is an amazing DFIR OS. If you want probably more popular and widely adopted OS, then check out SANS SIFT Workstation. It comes with quite a lot of tools and good cheatsheets. I did not test them that much in detail, but the reasons why I went with Tsurugi are that it is using a MATE as a desktop environment, while SIFT uses GNOME (I simply don’t like GNOME) and the fact that Tsurugi is a type of the Japanese sword, and I just love Japan and their history. :)
I encourage you to try both of them and choose the one that you like more. Both of them come with great pre-installed tools and amazing support. This guide will contain tools and extensions that both of these OSs support. After all, you can deploy whatever Linux distribution you want and install all those tools by yourselves.
Note: To be clear, these tutorials will not teach you how to perform OSINT, DFIR, malware analysis, pentesting, and so on. I am not teaching you how to use tools and the logic behind those operations. These are simple guidelines to create your own virtual environment for those operations. While I will maybe show some tools, those will be my recommendations. Over time I am pretty sure you will find what tools suit you the best.
Tsurugi Linux
As mentioned, we will use Tsurugi as our DFIR VM. It supports both the most popular desktop virtualization software, VMWare and VirtualBox so go to their website, download it (I suggest downloading the OVA file so you can just import it into your VMWare or VirtualBox) and let’s begin.
Let’s take a look at our network topology to see what we are trying to achieve here.
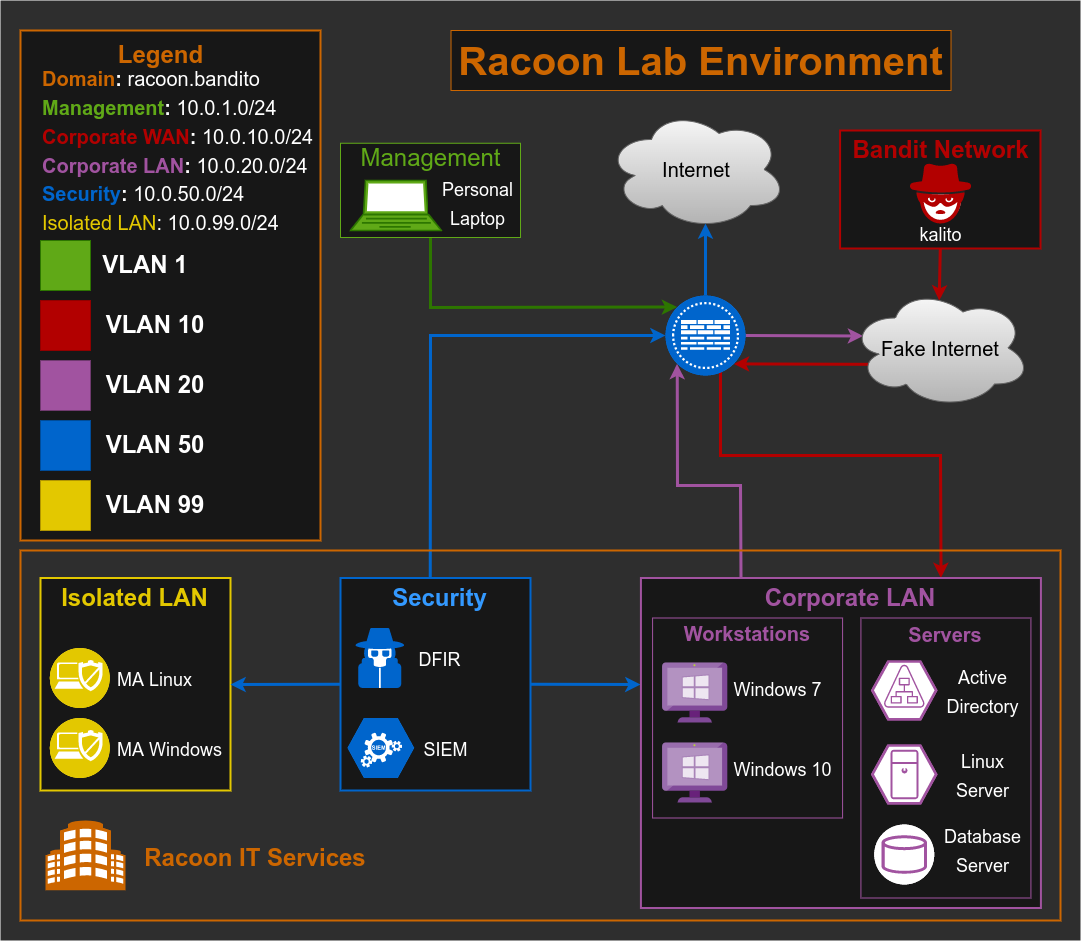
We are setting up a security team, which will have access to the real Internet so we could make upgrades, perform OSINT, download malware samples, etc. For some cases, I guess we can first download a malware sample for example, on our host machine and then move it to the MA VM through the shared folder, but I prefer to go this way, just in case.
Also, this VM should have access to a Corporate LAN network, so it can retrieve files and logs for analysis (but the Corporate LAN network should not have access to the Security Network).
Now to go back to the installation. During the import of the OVA file, we will leave most of the settings by default. For start, change only CPU from 2 to 4 (I set 2 processors, and 2 cores per processor) and set the network adapter to be in Vlan 50 (vmnet50).
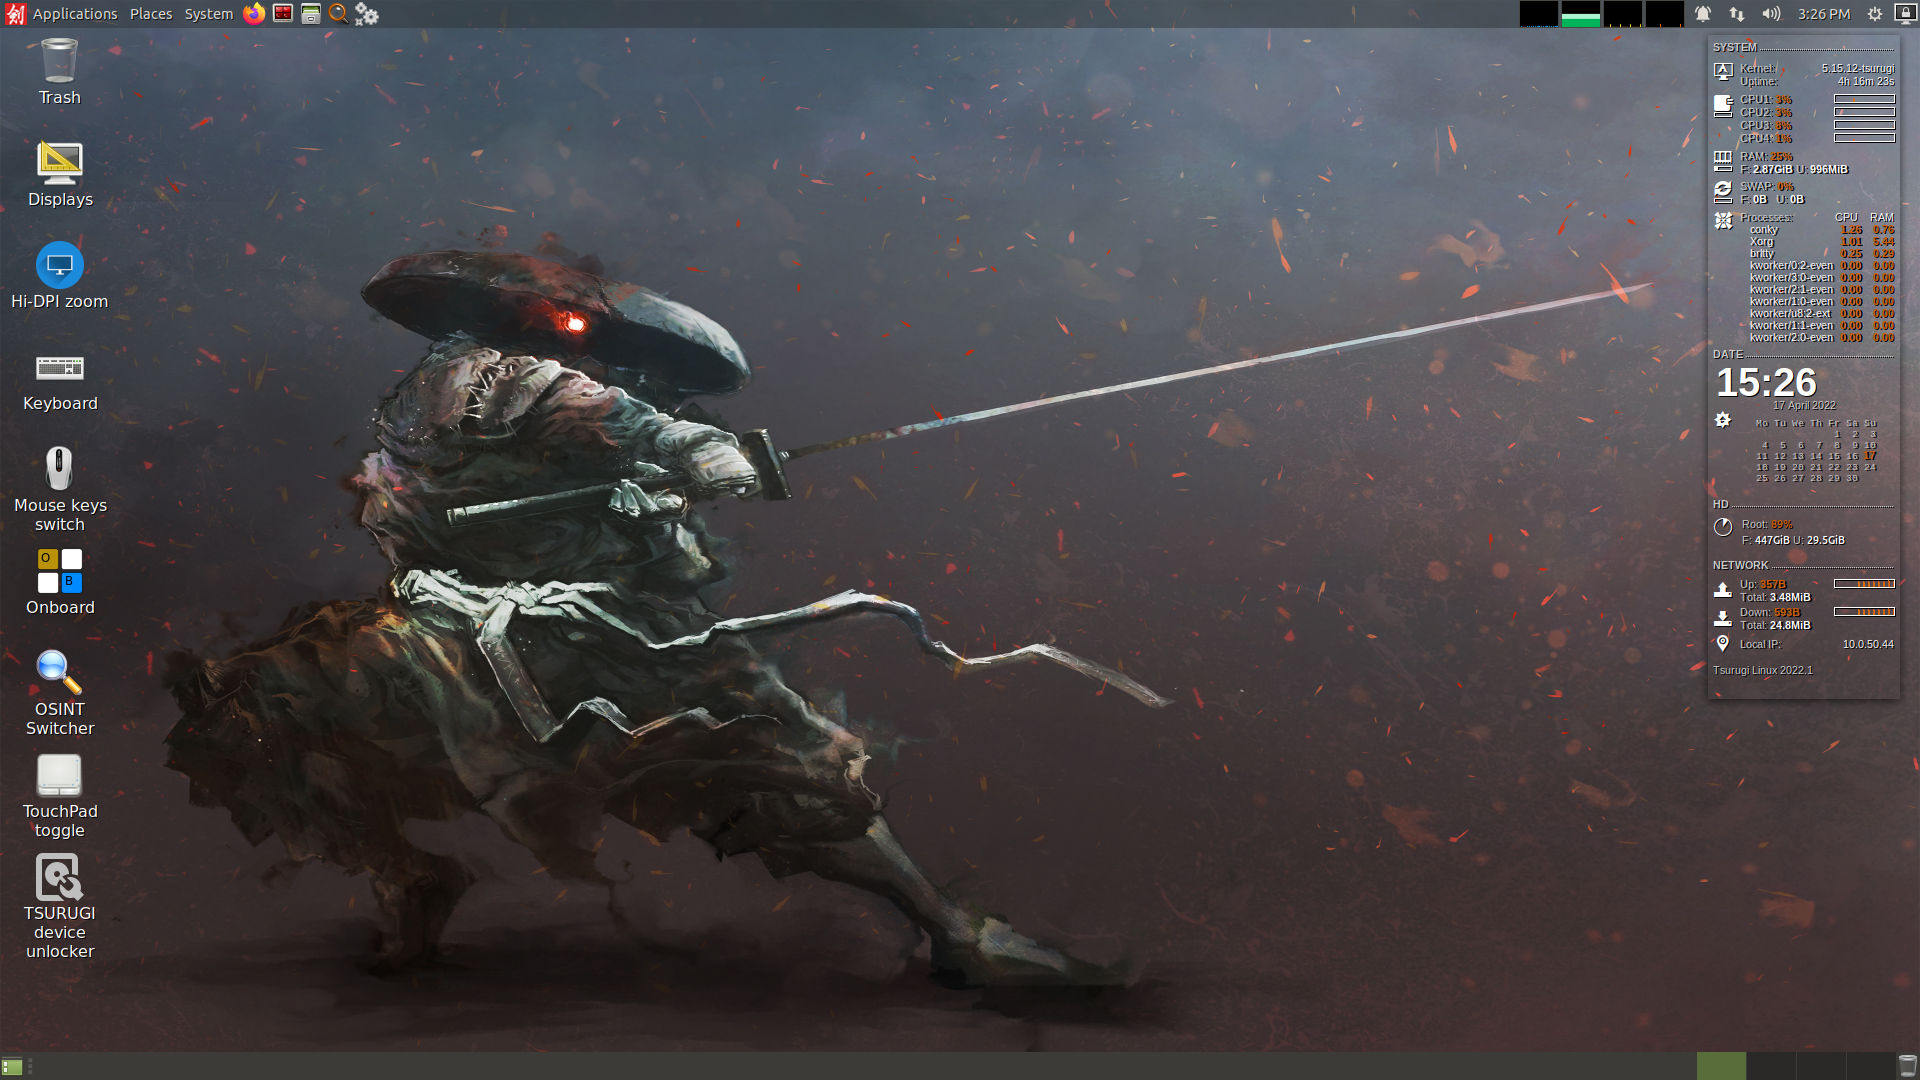
After you import the machine, run it, log in with the default credentials (username: tsurugi, password: tsurugi) and you should see starting window of Tsurugi Linux with an amazing background of a samurai.
Now, I will not explain in detail Tsurugi Linux, or what tools they have pre-installed, I leave that for you to explore, but I will mention that it comes with quite a lot of tools that are used in CyberDefender labs. Depending on what you are interested in, various labs on CyberDefender platform require various tools.
As I will use this VM mostly for OSINT and DFIR (not that much for malware analysis), some of the tools and sites shown below will be I guess more for those cases (but can be used for malware analysis too).
Basic config
There are a few things we need to do, to make it a complete real-life DFIR system. Let’s start by changing the default password with the passwd command.
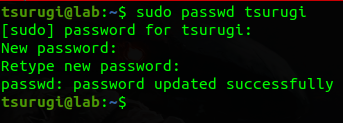
After changing the password log out and log in with the new password.
Next thing is to set a static IP address and a hostname of our VM.
To change a hostname we need to edit two files: /etc/hostname and /etc/hosts. After you change them they should look like the below:
1
2
3
tsurugi@dfir:~$ cat /etc/hostname
dfir
tsurugi@dfir:~$
1
2
3
4
5
6
7
8
9
10
11
tsurugi@dfir:~$ cat /etc/hosts
127.0.0.1   localhost
10.0.50.44  dfir dfir.racoon.bandito

# The following lines are desirable for IPv6 capable hosts
::1     ip6-localhost ip6-loopback
fe00::0 ip6-localnet
ff00::0 ip6-mcastprefix
ff02::1 ip6-allnodes
ff02::2 ip6-allrouters
tsurugi@dfir:~$
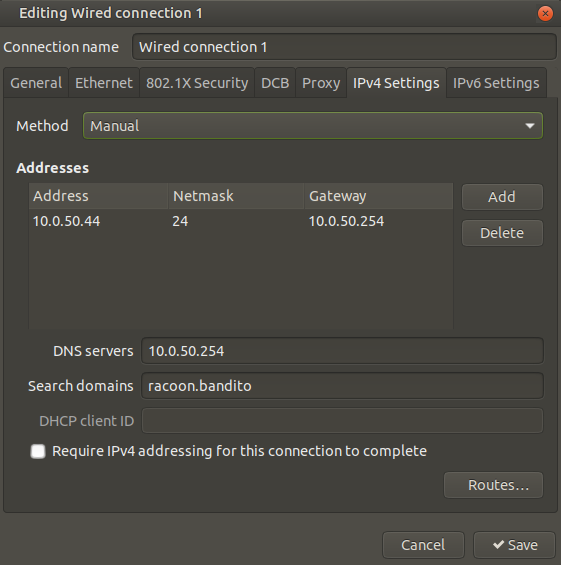
Let’s now set up a static IP by going to System > Preferences > Internet and Network > Advanced Network Configuration
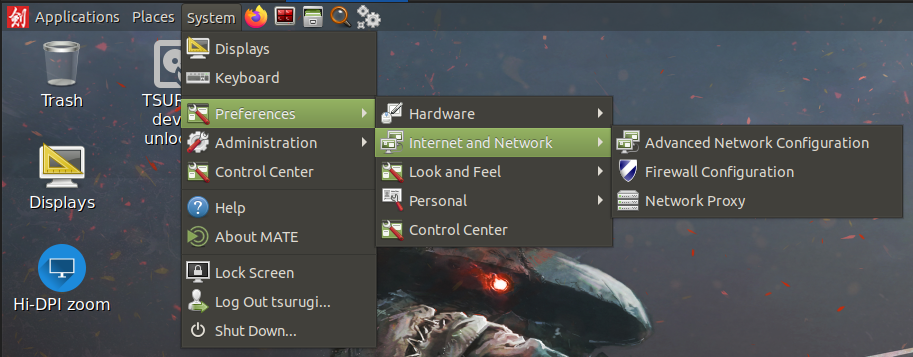
Edit your network connection and in IPv4 Settings configure static IP, with the gateway, DNS server, and search domains. Then click the Save button.
It is important now to reboot the VM so the hostname changes could be applied.
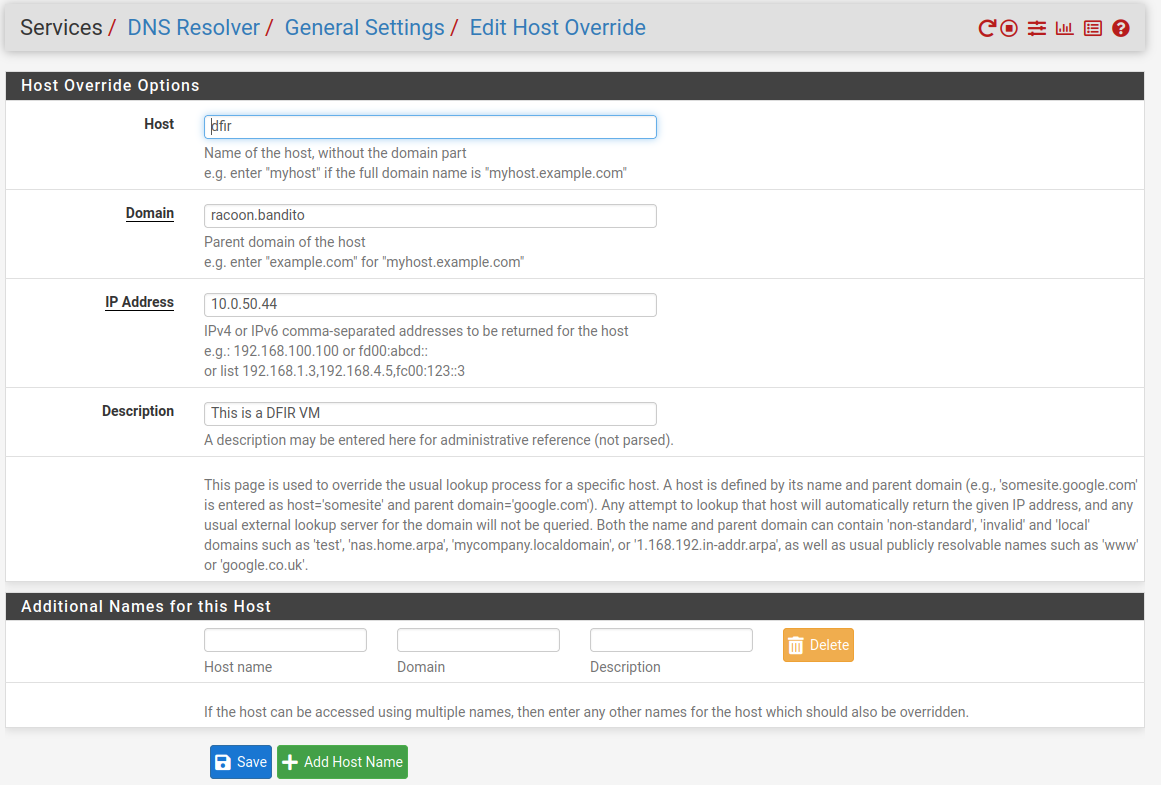
The final step for network changes is to create a host override record on our firewall. Go to ServicesDNS > ResolverGeneral > Settings and in the section Host Overrides click on the Add button. Add the following details like on the picture below:
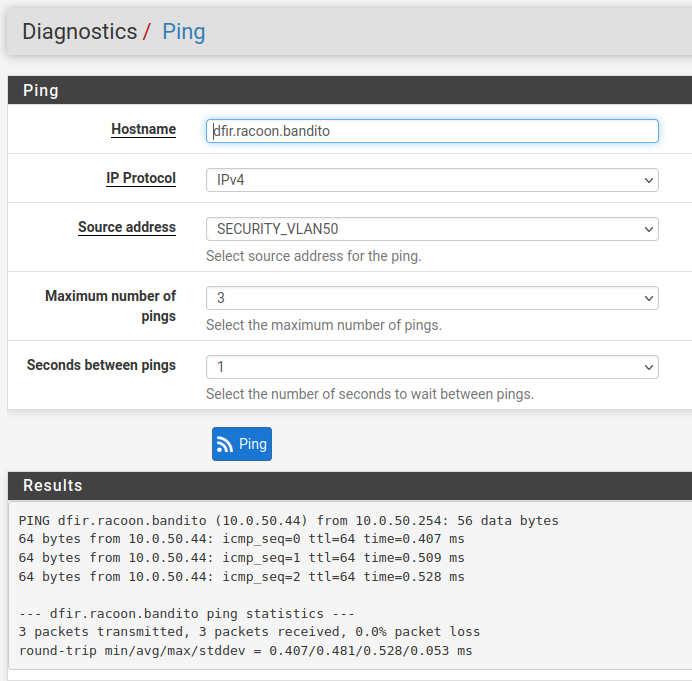
You should now be able to reach the machine by FQDN. You can test DNS with the firewall’s Diagnostics > Ping tool:
Note: Remember this process of creating host override records, as we will use them for other VMs too.
Additional web tools
Now let’s add new bookmarks to my still favorite browser, Firefox:
- VirusTotal
- Hybrid-Analysis
- Talos Intelligence
- urlscan.io
- Whois
- MXToolbox
- URL2PNG
- OTX
- OUI Lookup
- IP Location
- A-Packets
- Wannbrowser
- de4js
- Geolocate
- Yandex
- Wayback Machine
- Fake Mail Generator
I will leave it to you to do research about each of these tools and maybe find some better for your lab.
When it comes to the browser add-ons, Firefox here comes with a lot of them, but here are a few additional that I’ve added:
- User-Agent Switcher and Manager
- Wappalyzer
- Startpage - To be honest, I can’t remember if this one came pre-installed or not.
- Privacy Badger - The same story as with Startpage.
Additional system tools
Here’s the small script that will install additional tools that I stumble upon, during doing some labs (At some point I will probably update the script in case I forgot some tools or found a new one not included):
1
2
3
4
5
6
7
8
9
10
11
12
13
14
15
16
17
18
19
20
21
22
23
24
#!/bin/bash

# oletools - package of python tools to analyze Microsoft Office OLE2 files
# https://github.com/decalage2/oletools

pip install -U oletools

# pev - pev is a tool to get information of PE32/PE32+ executables (EXE, DLL, OCX etc) like headers, sections, resources and more.
# https://www.kali.org/tools/pev/

sudo apt install -y pev

# NetworkMiner - a network forensics tool that can parse pcap files as well as perform live sniffing of network traffic on Ethernet and WiFi networks.
# https://www.netresec.com/?page=Blog&month=2014-02&post=HowTo-install-NetworkMiner-in-Ubuntu-Fedora-and-Arch-Linux

sudo apt install -y mono-devel
wget https://www.netresec.com/?download=NetworkMiner -O /tmp/nm.zip
sudo unzip /tmp/nm.zip -d /opt/
cd /opt/NetworkMiner*
sudo chmod +x NetworkMiner.exe
sudo chmod -R go+w AssembledFiles/
sudo chmod -R go+w Captures/

# run NetworkMiner with the command 'mono /opt/NetworkMiner_2-7-3/NetworkMiner.exe --noupdatecheck'
As the final step, please create a snapshot of your VM so you can always have a base installed ready, and prepared, in case you break something on your machine. And that’s it, our DFIR machine is ready to be used!
Extra content
DFIR Science have really nice videos about Tsurugi Linux (and about DFIR in general, seriously this guy rocks) so I strongly recommend you to watch them.
- Tsurugi Linux: Download, verify and first start
- Tsurugi Linux - Device Unlocker Code Review
- Tsurugi Linux - Physical Image and Partition Mounting
- Awesome DFIR - A huge list of great tools for DFIR. I am pretty sure you will find something useful there.
Summary
So now we have created our first security VM, a DFIR VM, which we can use for OSINT, practicing on cool platforms like Blue Team Labs Online and CyberDefenders, and much more. In the next article, we are going to focus on creating a malware analysis lab environment.